The upstairs hallway bathroom is almost complete, and we are doing the Happy Dance. I LOVE IT! I typically don't say that about our projects because I am pretty critical of everything that we do, but I LOVE this new bathroom. It is probably my favorite transformation that we have accomplished to date.
Here is a not so pretty reminder of what our bathroom looked like before (get ready to be transported back to the 80's!)
 |
| BEFORE |
 |
| BEFORE |
 |
| BEFORE |
And for a much better reminder of where we left you off last...
 |
| TILE COMPLETE AND READY FOR THE FINISHING TOUCHES |
We have come a long way Baby! We had already purchased the vanity from Lowes a few months ago when Facebook was offering a 30% discount. LUCKILY, all of the tile selections that we chose from that point actually seemed to match the color of the wood and dark granite top of the vanity...Phew!
Nate got the toilet reinstalled (after he realized the toilet tank was cracked, it got swapped out with the toilet that we had saved from the downstairs powder room redo).
 |
| TOILET RE-INSTALL |
Now it was time to choose a paint color.
We had some paint left over from our townhouse bathroom and we thought that was going to work; However, when we put it onto the walls, it was too minty green. So, we took a couple of the other paint colors that we had used around the house and started to mix our own color. We tried mixing it with the color from the built-ins, we tried mixing it with the color from the kitchen/living room, and we tried mixing it with the color of the den. After much deliberation :) we decided that the best option was a mix of the old bathroom color and the gray from the kitchen/living room in a 50/50 mix.
 |
| COLOR OPTIONS- We chose the one on the left with a minor modification |
We taped everything (including the ceiling that Nate had already painted) and began painting. We were able to get one coat out of the paint that we had mixed. OOPS! We knew that it was going to be tight with how much paint we had, but we didn't think that it was only going to get us one coats worth. So, with the last bit left in the can we painted a small piece of leftover drywall, and Nate took it to Home Depot to have it color matched. And, it was a perfect match! Nate finished with the second coat of paint the following day.
 |
| PAINT COLOR WITH THE HALLWAY COLOR IN THE BACKGROUND (Most accurate pic of color) |
 |
| FINAL CUSTOM COLOR |
The final choices to make were the faucet, mirror, and the light fixture.
Nate picked up two faucets, one from Home Depot and one from Lowes. They were both satin nickel but one was more traditional and the other was more contemporary in style.
 |
| OPTION 1 FROM HOME DEPOT |
 |
| OPTION 2 FROM LOWES |
|
|
|
|
We both liked the style of the option from Lowes but we both agreed that it was too small and a little too contemporary for the vanity. We decided to go with Option 1.
Next up...the Light Fixture. We found the light fixture at Lowes and liked that we could choose the glass shade that we wanted to use. We decided on a clear seeded glass shade with clear bulbs so that you could see the filament in the bulb at work. It is a really industrial look and we loved the end result of it. There was a minor change out with the light fixture, but more on that later!
 |
| REWIRING FOR THE NEW FIXTURE |
The mirror was quite a challenge for us. We did not like the look of the mirror that matched the vanity. The vanity is a dark cherry color so we were worried that we weren't going to find a mirror that exactly matched the color. We went on a mirror hunt at Home Depot, Lowes, Marshalls, and Bed Bath and Beyond with no luck. We were searching for either a wood mirror or something metal that would tie in the satin nickel and the dark floors. I checked Overstock and really liked two of the mirrors there, but the prices of each were over $150.00 and that was too much when talking about a mirror!
Off to Home Goods one morning before work. I came across something that I thought would work. The size was right, the finish wasn't bad, and the $39.99 price tag was hard to beat. On the way home from work I stopped at Target and found a round oil rubbed bronze mirror that could also work. This mirror was $41.95 so it was also a great deal. I took them both home to make the decision.
 |
| HOME GOOD MIRROR |
 |
| TARGET MIRROR |
When looking at both mirrors, I initially fell in love with the round mirror. I loved that it picked up on the penny rounds and the color was a great tie in to the other details in the room; However, Nate pointed out that the round mirror was a bit small for a bathroom with future high use and the rectangle would offer more function. I compromised and I have to admit...he was right. (I hope that he doesn't read this post!)
 |
| PROGRESS! |
When we stepped back to look at the progress (see above), we realized that the light fixture looked too small. Luckily, there is a four light fixture in the same style. I ran back to Lowes to get the four light fixture while Nate started to work on changing out the chrome tub fixtures (info on that in a future post).
I returned with the four light fixture, we re-wired it and were both satisfied with our decision for the change out.
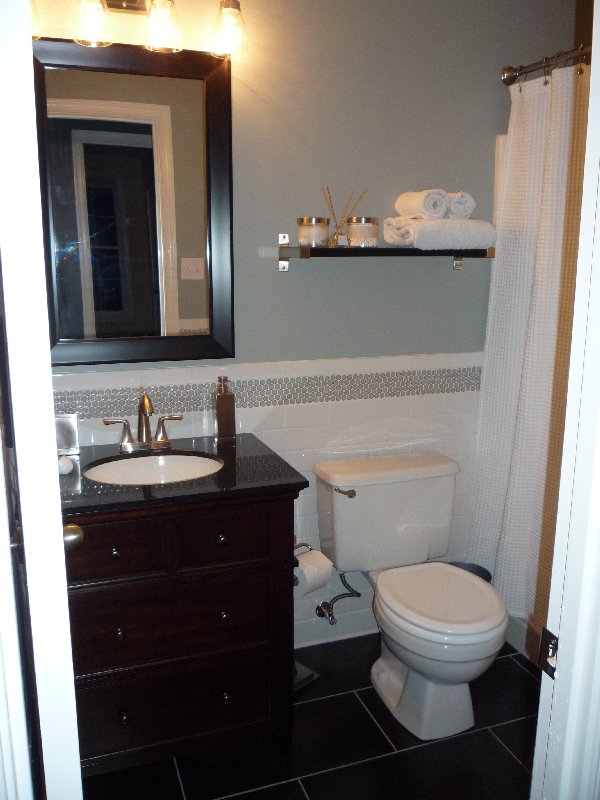
We added a new soap dispenser, toothbrush holder, and hand towel ring from Lowes, and a toilet paper holder from Home Goods. We also added an Ikea shelf that we previously owned above the toilet for extra storage space. We will also be hanging towel hooks from Lowes on the wall opposite of the toilet in the very near future (just looking for a fourth hook!)
 |
| FINISHED! |
Before and After...
|
| BEFORE |
|
 |
| AFTER |
There are some minor paint touch-ups that still need to be done and I still need to paint the door and the door trim but we are calling this project...DONE!


What a transformation! Using the penny tile as a border -- wow!
ReplyDeleteWhat are the dimensions of this bathroom?
ReplyDeleteThis bathroom is approximately 5'x7' including the tub area.
ReplyDelete